Saturday, 14 January 2012

Open a new browser window using javascript

Hi friends,
   Here I am discuss about open a new browser window when click a button
using javascript
.Have you see pop up windows containing advertisements?
We can create like one very easily.
  
   The javascript function used for pop up a new window is window.open().
The syntax for window.open is :
window.open('http://www.google.com','window_name','width=400,height=200');

   In this function first parameter is the URL of the website to be loaded
in the poped up window opened.Here I am use the address of  Google.com.

   The second parameter of open() function is the name of the window.We
can use this name to access the window later.

   The third parameter is using to set the dimensions of the window which is poped up.

Code of a simple form pop up the Google in a new window:

<FORM>
<INPUT type="button" value="Click Me" onClick="window.open('http://www.google.com','Google','height=600,width=600')">
</FORM>


  Here the window.open() function is called in the onclick event of the button in the form.When click in the button , a pop up window with 600 pixel height and 600 pixel width is opened and google.com will load in it in no time.

  In the third parameter we can include more options like the position of the window.We can use the top and left parameters to set the top and left of the window.

<FORM>
<INPUT type="button" value="Click Me" onClick="window.open('http://www.google.com','Google','height=600,width=600,left=0,top=100')">
</FORM>


This code will open a window with 600 pixels height and width and the top left of the window will be (0,100).
But one thing to be noted is that all these are belongs to the third parameter so these are within a single inverter comma('').


We can also specify that which tool bars will appear in our new window just like this
window.open ("http://www.javascript-coder.com", "mywindow","status=yes,toolbar=no");
By this code I am allowing the status bar and disallow toolbar.

  The other values set in the third parameter is as follows :


status     :     The status bar at the bottom of the window.
toolbar    :     The standard browser toolbar, with buttons such as Back and Forward.
location   :     The Location entry field where you enter the URL.
menubar    :    The menu bar of the window
directories:     The standard browser directory buttons, such as What’s New and What’s Cool
resizable  :    Allow/Disallow the user to resize the window.
scrollbars :    Enable the scrollbars if the document is bigger than the window


   windows.close() can be used to close the opened window.
Another thing to be noted is that many browsers block the opening of pop up windows.So inorder to work  the code above explained please unblock the pop up windows in your browser's settings.

I am including a screen shot :


Thank you to my dear friends.
You can read :-

Facebook like pop up window using jquery


By Sukesh B R

Thursday, 12 January 2012

Multiple submit buttons in a Form in PHP explain with an example

Hi friends, today I am discussing handling multiple submit buttons in a single Form in PHP.
 
According to typical HTML architecture there have one submit button for a Form.When this submit button  is clicked the php page specified by the form action parameter is loaded.

          But some situations we need multiple submit buttons in a single form.In such situations the php page loaded by clicking distinct buttons is same.But the task executed will be different.We can achieve it by isset()  function of PHP.
  
          The syntax for isset() is : isset($_POST["name of submit button in the form"])

We can write the  code for the action page like this:-
 
<?Php
if(isset($_POSt["s1"]))
{
echo "You pressed submit 1";
}

else if(isset($_POSt["s2"]))
{
echo "You pressed submit 2";
}
?>

Where s1 and s2 are the name of submit buttons in the form.

Here I am including a simple calculator example to clear  this concept

This is a screen shot of the program:

 
Source code
calculator.html

<html>
<body>
<form name="f1" method="post" action="sub.php">
Number1 <input type="text" name="n1"></br></br>
Number2 <input type="text" name="n2">
</br></br>
<input type="submit" name="add" value="+">
<input type="submit" name="sub" value="-">
<input type="submit" name="mul" value="*">
<input type="submit" name="div" value="/">
</form>
</body>
</html>

 sub.php 

<?php

if(isset($_POST["add"]))
echo "Sum : ".($_POST["n1"]+$_POST["n2"]);

else if(isset($_POST["sub"]))
echo "Difference : ".($_POST["n1"]-$_POST["n2"]);

else if(isset($_POST["mul"]))
echo "Product : ".($_POST["n1"]*$_POST["n2"]);

else if(isset($_POST["div"]))
echo "Quotient : ".($_POST["n1"]/$_POST["n2"]);
?>


code description:


In calculator.html we can see a form.There have 2 text boxes and 4 submit buttons.The two submit buttons are the
two numbers to perform arithmetic operations.The four submit buttons are for additon,substraction,multiplication and division.
The name of the submit buttons are add,sub,mul,div respectively.

       In sub.php four if else statements are used to determine which submit button is clicked.
 
First if is:
if(isset($_POST["add"]))
Where 'add' is the name of first submit button.isset($_POST["add"])  return TRUE if the submit button clicked is 'add'.If it return true 
echo "Sum : ".($_POST["n1"]+$_POST["n2"]); 
this statement will execute.So the sum of given numbers will be displayed.
If isset() returns FALSE go to the next if statement and check for the click of next submit button.This process will be continued till the clicked button is found.Thus our calculator works properly.

isset() is the standard way to achieve this but we can simply write
if($_POST["add"])
{
echo "Sum : ".($_POST["n1"]+$_POST["n2"]);

for achive the same result.

Hope that this post is helpful to you.Thanks by Sukesh B R

Saturday, 31 December 2011

Introducing AJAX with a simple example program

Hi Friends,
   Today I am going to discuss little AJAX.AJAX means Asynchronous Javascript
And XML
.   AJAX is used to send data to server and receive data from server without
reflect in the screen.Basically HTML pages are static and the are precomposed
by the server. So any change in any part of the page requires the entire page to be reloaded.
But using AJAX we can change only the required part of the page without reload the entire page.

       Ajax is not a programming language.This is only a programming technique.We use javascript to call Ajax functions.
javascript simply makes an object of  XMLHttpRequest  class of Ajax.Then call the open() method.The result will be the part  of page will be reloaded.

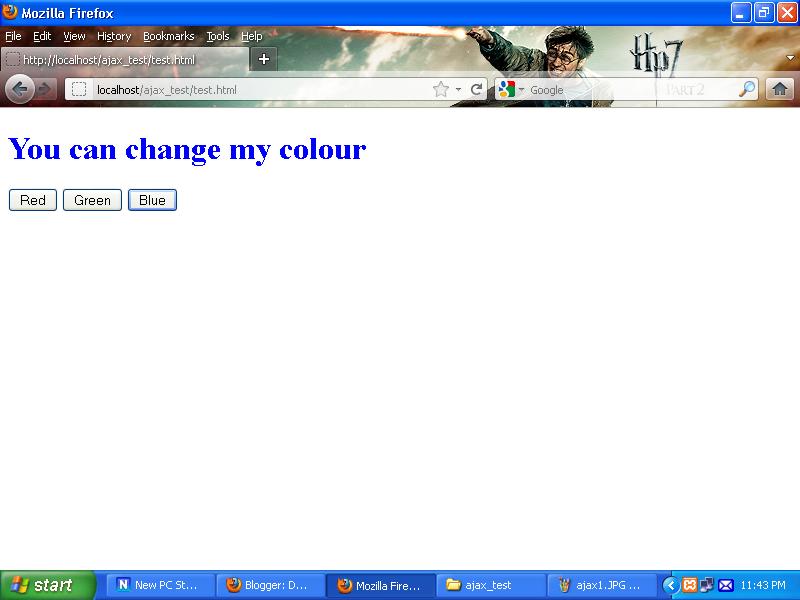
I am here introducing a simple example to understand the concept more clearly:

This is a web page have a text and three buttons named RED,GREEN,BLUE.
in the start the text is black.When click in red button the text color changed to Red.When click in Green button
the text color change to green if click in Blue button the text will be displayed in blue colour.The think to be noted that the
page never reloaded fully.But only the required part is reloaded.

I am including some sample screen shots.


There have two pages
1.index.html
2.msg.php


1.index.html


<html>
<head>
<script type="text/javascript">

function func(opt)
{
   var xmlhttp;
  if (window.XMLHttpRequest)
     {       // code for IE7+, Firefox, Chrome, Opera, Safari
  xmlhttp=new XMLHttpRequest();
  }

else
  {// code for IE6, IE5
  xmlhttp=new ActiveXObject("Microsoft.XMLHTTP");
  }
xmlhttp.onreadystatechange=function()
  {
  if (xmlhttp.readyState==4 && xmlhttp.status==200)
    {
    document.getElementById("target").innerHTML=xmlhttp.responseText;
    }
  }
xmlhttp.open("GET","msg.php?opt="+opt,true);
xmlhttp.send();
}
</script>
</head>
<body>
<div id="target">
<h1>You can change my colour</h1>
</div>
<input type="button" value="Red" onclick="func(1)">

<input type="button" value="Green" onclick="func(2)">

<input type="button" value="Blue" onclick="func(3)">


</body>
</html>


2.msg.php


<?php
$opt=$_GET["opt"];
switch($opt)
{
case 1:
echo "<h1 style=\"color:red\">You can change my colour</h1>";
break;

case 2:
echo "<h1 style=\"color:green\">You can change my colour</h1>";
break;

case 3:
echo "<h1 style=\"color:blue\">You can change my colour</h1>";
break;
}
?>

Code Description

First go through index.html

Do you notice the three buttons.The onclick event of each button calls the javascript
function func()
.Each button call the func() with different parameter 1,2,3.
      The javascript function func() is defined in the <head> section.
      var xmlhttp; is the first step.We just declare a variable named xmlhttp.

Next step is xmlhttp=new XMLHttpRequest();.
that is initialise xmlhttp  XMLHttpRequest() with class.
But in Internet explorer5 and 6 the class is little different.Because it uses ActiveX
object to call Ajax.That is determined with the if statement in the code.

Next one is a nested function  xmlhttp.onreadystatechange=function().  In this function check for the status of the page.
document.getElementById("target").innerHTML=xmlhttp.responseText; this statement sets the innerHTML     property of       element target into the responseText or the return text.Please not that
the id of div in the html page is 'target'.

      Next is the core of Ajax,the open() method,  
xmlhttp.open("GET","msg.php?opt="+opt,true);
In the open method there have three parameters.

1.  GET    it describes the request is send as GET or POST.GET have a limitation in send parameters.
But GET is enough in this situation.Use post when handle large amount of data.

2.  he second parameter "msg.php" is the name of the php page to which data is send and receive the HTML.
The parameter opt is also send to the php page.The opt is the parameter send to the javascript
function by the HTML page.

3.  Next parameter is true.It specifies the data is send synchronously or
asynchronously.Our purpose is asynchronous so set this parameter always true.

Next is send() method 
xmlhttp.send();

When call this method the request is send to server.

Let's go through   msg.php
The parameter(opt) passed to msg.php is retrived to the variable $opt like this $opt=$_GET["opt"];
Then give this parameter to a switch and according to the value of opt
the color of text is changed.Style parameter is used for change the text color.

The output HTML generated by this page is send to the previous HTML page(index.html) and
it is displayed in the <div> block of index.php through innerHTML property of javascript.

Hope that this post is helpful to you.
I will come with more AJAX Tutorials in coming posts.

By Sukesh B R  sukeshbr@gmail.com


Thursday, 29 December 2011

Shut down or Restart Windows using Visual Basic 6

Hi friends now I am discuss about restart or shut down windows XP or higher versions using Visual Basic 6.
Usually we use start menu then the shutdown button to  shut down.
But we can use the shell functions in VB 6 to shut down windows.

It is a single step statement:

Shell ("shutdown.exe -s -t 00")

Where shell() is the library function.
shell have three parameters,
shutdown.exe is a system program run on windows

-s specify the operation to be executed such as shut down/restart.
-s for Shut down,-r for Restart and -l for Log off.

The third parameter -t 00 specifies the time delay taken before the operation execute.
-t 00 specifies wait for 0 seconds,where -t 30 means wait 30 seconds before shut down.

  The scope of this function is very large.
For instance, we can make a vb form in which the shell function  Shell ("shutdown.exe -s -t 00")
is added in the form load event.Then make the project.exe.Then made a short cut icon to this .exe
file in desktop.In short cut icons properties set it's short cut keys to 'ctrl+alt+s'.Then press
these keys the computer will shut down in no time without asking anything.You can use this application to
shut down computer when you have no time to click start->Turn off computer->Turn off.

Hope that this post is helpful to you.
By Sukesh B R

Saturday, 10 December 2011

HTML event occur when focus of control loses

Hi Friends now I am discuss about onblur event in HTML.Onblur event is triggered
when selection of a control like text box or button loses
.Onblur can used to call a javascript function which do a specific task such as validation/case change.


I am here including a sample program.

<html>
<head>
<script type="text/javascript">
function Casechange()
{
var name=document.getElementById("txtname").value
document.getElementById("txtname").value=name.toUpperCase()
}
</script>
</head>
<body>

Enter your name: <input type="text" id="txtname" onblur="Casechange()">

</body>
</html>


This program will convert the name entered in the name text box into upper case.
Hope that this post is usefull to you.
Thanks By Sukesh  sukeshbr@gmail.com

Sunday, 4 December 2011

Play wav file using HTML

Here I am discuss about playing an audio file with HTML.For flexibility I am only introducing   play wav files.

You can see a demo here :-


The html code:
<audio controls="controls" autoplay="auto play">
<source src="ringin.wav" type="audio/wav">
</audio>

The core of this code is <audio> tag.The 'controls' attribute is to display audio controls such as play/pause
button and mute button.If we don't include this tag the browser play
the wav file but there will be nothing displayed in the screen.
'autoplay' attribute specifies whether the audio file is play when load the page.If 'autoplay' doesn't set the audio file will not play since
the play button clicked.
   The <source> tag is used to specify the file to be played.'src' attribute is specify the wav file to be played.If the file is in the same location
as the html page we need to specify the name,otherwise the files location too.
The 'type' attribute is used to specify the type of audio file ,here 'audio/wav'.


I will be explain play a video using HTML in a coming post.
Hope that this post will be helpful to you.
By Sukesh B R.
email:sukeshbr@gmail.com

Thursday, 1 December 2011

Show a web site icon besides the website URL

Here I am discussing show an icon in the browsers address bar beside the site URL.
You just add this code to your head section of the html page.
code:

<html>
<head>
<link rel="shortcut icon" href="icon_name.ico">
</head>
<body>
<h1>Did you notice MSN icon is present in your address bar!!!!!</h1>
</body>
</html>

where 'icon_name.ico' is the name of the icon to be displayed.
This code works if the icon file exist in the same location of the html file.If this icon
is in a different location we must specify the location like
href="d:\icon_name.ico".


I am including a sample screen shot :


Hope that this post will be helpful to you.
With thanks Sukesh B R

Search This Blog